Sunday, November 18, 2012

Pumpkin Macarons II

Thanksgiving is 5 days away! This year is really flying by! I’m especially excited for Thanksgiving this year because I’ll be celebrating the holiday with my boyfriend and his family in Las Vegas. I’m known to my friends, family and coworkers as the cake pop and macaron girl, so of course I will be contributing one of the two for Thanksgiving this year. I may do both, but pumpkin macarons are a must bring.

From Trader Joe's website

Have you seen this at Trader Joe’s?

Pumpkin butter. Get in the car. Drive to Trader Joe’s. Buy it now!

This was a main ingredient for the filling in my pumpkin macarons this year. It did not disappoint.

I used my favorite macaron recipe from Mad about Macarons by Jill Colonna (the one with 150 grams of egg whites) I added 2 teaspoons of pumpkin spice and a few squirts orange gel coloring to get the dark orange fall color.


The filling for the pumpkin macarons is super easy!  So easy, I didn't take any pictures of it.  It only requires two ingredients, three if you really want it to be super pumpkin-y.

Pumpkin Filling
8 oz of cream cheese
Jar of Trader Joe’s pumpkin butter
Teaspoon of pumpkin spice*
Cream the cream cheese with a paddle attachment until smooth, add the whole jar of pumpkin butter, whip.  Taste. Add additional pumpkin spice as desired.  Continue whipping until smooth.

Fill your pumpkin macarons, eat and let the pumpkin flavors explode in your mouth. 


The pumpkin butter has a slight tartness to it that I prefer over the filling I made last year. You can find the recipe here. I’m all for macarons with lots of flavor. I like to bite into a cookie and know the flavor right away. I’m not one for subtle flavors. You can adjust the amounts of pumpkin spice based on your own preference.

Don't have time to make your own?  Trader Joe's has pumpkin macarons this year!  A dozen for $4.99 What a deal!

They can be found in the freezer section.


Enjoy!

Friday, November 16, 2012

Wax Paper vs. Parchment Paper

Wax paper vs. Parchment paper.  Is there a difference?  YES!  I thought they were the same thing!  How come no one told me?  Maybe I should have asked...

Last night I made a batch of pumpkin macarons and used parchment paper for the first time.  It was in the holiday aisle at Target. 

When I took the cookies off the paper, I had ah-ha moment!  WTH?  Why have I not used this earlier?  Doh!  They work as well as a silpat!

Rule:  Don't use wax paper for macarons!  Use parchment!  Works as well as a silpat! 

Lesson learned. 

Saturday, November 10, 2012

Pink Parisian Wedding Dessert Table

On June 1st my sorority sister Jackie married her best friend Samuel. They had a beautiful wedding in Newport Beach. Jackie is an event planner extraordinaire, so I knew her wedding was going to be nothing short of exceptional and impressive.

I was happy to contribute macarons and cake pops to her gorgeously styled dessert table.


The wedding theme was romantic, soft, ethereal  elegant and Parisian.  I think the table captured the theme beautifully.  The colors were pink, blush pink with touches of gold.  I love the petal table cloth, flowers, and of course the sweets!

I made three different types of cake pops to go with her theme. I made simple round cake pops with three different flavors using the mini bow candy mold, mini rose candy mold and and a soft pink cake pop with white non-pareil sprinkles to differentiate the flavors. Jackie purchased the cake pop stand to showcase the cake pops. 


I made three macaron flavors, pink with chocolate ganache, light pink with a Swiss Meringue Strawberry Buttercream, and Salted Caramel Macarons.  All the macarons were brushed with luster dust to make it look elegant.

Other mini desserts included fruit tarts, mini cupcakes, and candy purchased by Jackie.

All photos by Bret Cole Photography.

Tuesday, October 9, 2012

Pistachio Macarons

I started to get back in the baking mood once October hit and the weather started cooling down. I thought about what flavor macarons I wanted to make for fall and an obvious one is pumpkin, but I also wanted to do something different and experiment with other nuts and went with pistachios. The green colors really remind me of fall.

I used my favorite macaron recipe from Mad About Macarons by Jill Colonna. If you want to make perfect macarons each time, get her book! I also like her recipe, because compared to other macaron recipes I see online, her recipe requires less sugar.

So for pistachio macarons, I used Jill’s basic macaron recipe replacing half of the almond flour with pistachio flour.


From Trader Joe's website

I bought a bag of dry roasted/unsalted pistachio nut meats from Trader Joe's, and blended it to a flour mixture using my magic bullet. Tip: For those who'd like to make pistachio macarons, make sure you take the skin off the pistachios before grinding. I figured the skin was already off but it was not, and if you blend pistachios with the skin on, it leaves a gritty texture.  This bag was just enough for the batch of macarons and pistachio buttercream.  I did have some left over. (I used 75 grams for macarons).

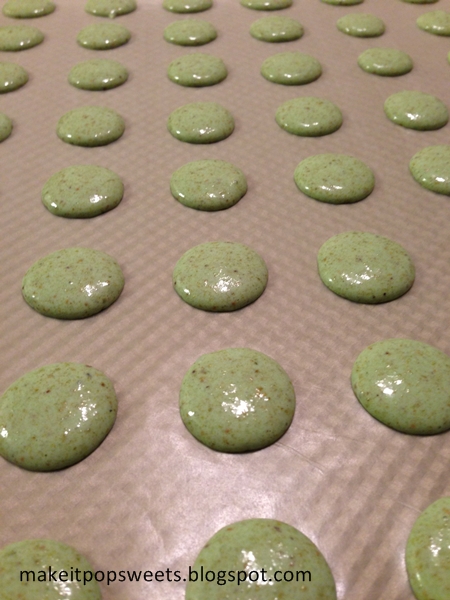
I also added a bit of green gel food coloring to the macaron batter make it a bit more green.  Once mixed, I piped them.


I let the macarons sit for about half an hour and let them form a skin before I put them in the oven.

While the macarons were chillin, I started on the pistachio buttercream. If you follow my blog, you’ll know my go to filling is usually always a Swiss Meringue buttercream. I didn't set any eggs out so I went with a Pistachio buttercream I found here.  I changed it up a bit because her recipe used grams and I did not feel like measuring out the butter.  It worked out really well.  I didn't take pictures of the pistachio buttercream process but the link above has great images.

Pistachio Buttercream
1 cup of butter
1 cup of pistachio paste*
*I made my own. I blended a cup of pistachios in the magic bullet, once it becomes as powdery as you can get it, add 4 teaspoons of simple syrup*
*Simple syrup – In a small sauce pan boil 3 parts water and 1 part sugar on high. Once it boils, lower the temperature until the sugar dissolves and the syrup is clear. This should only take 3 minutes. I used a small amount and it only took a minute.
1 ½ cups to 2 cup of powdered sugar*

*I didn't really measure, I just added enough until it was sweet enough. There is already a lot of sugar in the macarons.

Using my Kitchen Aid mixer with the paddle attachment I mixed the softened butter until it was whipped, I added the pistachio paste until it was well blended and slowly added the powdered sugar until I got it to the sweetness I wanted.  The mixture was a muddy brown, so I added a bit of green gel coloring until it turned to a beautiful olive green.

I set the filling aside, and baked the macarons at 320 degrees for 12 minutes.  Right out of the oven.


Once cooled, I peeled the macarons off the wax paper, and matched them up by size.


For large batches (this one made 9 dozen 1 inch rounds) I prefer wax paper to silpat, only because I can get an extra row of macarons on the sheet.


I piped on the filling, using a 1 inch tip.  I love the olive green color!


And sandwiched!

Aside from the gritty texture, these were delicious! (I’m not biased at all).

Also, I know I’m years behind but I finally got an iPhone! I got the iPhone 5 and I love, love the camera on the phone.


Also, I’m now on instagram.   You can expect to see macaron images like these, sweets, friends, babies and weird randomness.  I'm m0kavelli.

Blue & Yellow Macarons


Friday, August 31, 2012

I'm back!

I was on a hiatus for a while.  My laptop shut down and it has been sweltering hot.  Too hot to bake!  With the weather slowly cooling down I'll be back to baking up a storm soon.  I made desserts for some lovely weddings this summer and am excited for new events this fall.

Check out photos from my friend Amy's beautiful wedding to Matt in Santa Barbara!  


Happy Labor Day! 

Sunday, June 17, 2012

Adventures in Cake Decorating: Green Ombre Cake

I took a Wilton basic decorating class a few months ago at Joanns and I really enjoyed it.  I may take more in the future, but for now I'll practice the basics until I get better.

If you have seen my 'cake inspiration' board on pinterest, you'll know I love ruffles, petals and ombre!  The latest pin is a Pastel Swirl Cake from Sweetapolita.  She has a great video tutorial on how to make this beautiful cake here.  I had the weekend off and decided to try and make this same cake but use an ombre effect.  It was perfect timing for father's day. My sister had to work, so I made a cake for her husband for her.

I started by baking a dark chocolate cake in two 8" rounds.  I used my favorite cake box mix.  While the cakes baked and cooled I made two batches of American Buttercream and split them into three batches.  I decided to go with the color green and used leaf green gel coloring to get the colors I wanted.


I did a quick crumb coat with the lightest color.  It looks like mint chip ice cream.  I let it sit in the fridge for about half an hour to set.  I love baking but I hate washing dishes, so during my "wait time" I'll wash dishes right after or I'll never get to them.

The cake cooled and I used the technique from the Sweetapolita video tutorial to start frosting the second layer.


I love the green pastel colors.  I did a quick thick coat and smoothed it out.  It looked great but I wanted it to have a bit more texture.  I have a cake comb and used it to add some texture to the cake.


I liked the added texture on the cake because it adds depth to the color.  My niece and I made a quick banner to put on top of the cake and she wanted to add blue sprinkles to make the green pop out.

I need to work a bit more on my frosting technique, but I'm happy with my first ombre cake!

Happy Father's Day!

LinkWithin

Related Posts Plugin for WordPress, Blogger...